还在为Java无法写客户端而烦恼吗?不要怕,大胆的拥抱JavaFX吧!保证让你从入门到放弃!
最简单的项目
来,让我们创建一个最简单的JavaFX项目吧
创建项目
从官网下载JavaFX依赖
回到项目中,File-Project Structure...-libraries-加号-你JavaFX解压后的路径/bin下的所有jar包
创建启动类
package vip.linfeng.javafx01;

import javafx.application.Application;
import javafx.stage.Stage;

public class Main extends Application {

    public static void main(String[] args) {
        Application.launch(args);
    }

    @Override
    public void start(Stage stage) throws Exception {
        // 设置title
        stage.setTitle("林风测试");
        // 显示窗口
        stage.show();
    }
}
启动项目(配置参数)
然后,当你第一次启动时估计会报错:
错误: 缺少 JavaFX 运行时组件, 需要使用该组件来运行此应用程序不慌,咱们直接配置一下vm虚拟机的参数
点击项目-Edit Configurations...-Modify options-Add VM options-在VM options中配置下面参数(注意:路径要写你解压的路径)
--module-path "D:\lib\sdk\javafx-sdk-21.0.7\lib" --add-modules javafx.controls,javafx.fxml最后ctrl+shift+F10完美运行
基本代码
当你准备好后,你就可以开始愉快的敲代码啦!
首先,写个最基本的标签、布局、场景、窗口
public class Main extends Application {

    public static void main(String[] args) {
        Application.launch(args);
    }

    @Override
    public void start(Stage stage) throws Exception {
        // 创建标签
        Label label = new Label("你好呀");
        // 创建布局,并将标签扔到布局中
        BorderPane pane = new BorderPane(label);

        // 创建场景,并将布局扔到场景中,并设置宽高
        Scene scene = new Scene(pane, 300, 300);

        // 将场景设置到窗口中
        stage.setScene(scene);
        // 设置title
        stage.setTitle("林风测试");
        // 显示窗口
        stage.show();
    }
}
运行结果如下:
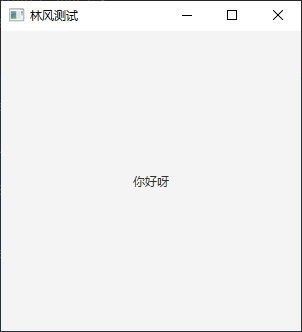
完美!
基础部分
我先撂下官方文档
这里不过多解释各种控件用法和方法事件,我感觉只需要看官方的文档就足够了
Application类执行顺序
通过main()执行Application的launch(String str)方法,当然launch(String str)方法不传入任何值也是可以执行的.launch(String str)方法会默认执行本类下的init()、start()、stop()方法。执行下面的main()方法后显示顺序为:
这是初始化方法->这是start()方法->这是stop()方法->这是main()方法。
举例
public class Main extends Application {

    public static void main(String[] args) {
        Application.launch(args);
    }

    @Override
    public void start(Stage stage) throws Exception {
        System.out.println("这是start方法");
        // 设置title
        stage.setTitle("林风测试");
        // 显示窗口
        stage.show();
    }

    @Override
    public void init() throws Exception {
        super.init();
        System.out.println("这是init方法");
    }

    @Override
    public void stop() throws Exception {
        super.stop();
        System.out.println("这是stop方法");
    }
}
运行结果:
这是init方法
这是start方法
这是stop方法
按钮组件及其单击事件
public class Main extends Application {

    public static void main(String[] args) {
        Application.launch(args);
    }

    @Override
    public void start(Stage stage) throws Exception {
        // 创建按钮组件
        Button button = new Button("有种你点我啊");
        // 创建布局并将按钮扔进去
        BorderPane pane = new BorderPane(button);
        // 设置按钮单击事件
        button.setOnAction(e -> {
            getHostServices().showDocument("http://blog.linfeng.vip");
        });
        // 创建场景并把布局扔进去,并设置宽高
        Scene scene = new Scene(pane, 300, 300);
        // 将场景扔到舞台
        stage.setScene(scene);
        // 设置标题
        stage.setTitle("林风最帅");
        // 显示窗口
        stage.show();
    }
}
Stage类
Title:设置title标题文本
icon:设置窗口图标
resiziable:窗口是否可以改变大小
x,y,width,height:设置坐标和宽高,不常用
StageStyle:窗口风格样式
Modality:是否为模态窗口
event:窗口事件,关闭、最大化、最小化等等,不常用
案例
    @Override
    public void start(Stage stage) throws Exception {
        Button button0 = new Button("窗口0");
        Button button1 = new Button("窗口1");
        // 设置按钮位置
        button0.setLayoutX(200);
        button0.setLayoutY(200);
        button1.setLayoutX(200);
        button1.setLayoutY(250);
        // 创建锚定容器
        AnchorPane pane = new AnchorPane();
        pane.getChildren().addAll(button0, button1);

        button0.setOnAction(e -> {
            Stage stage0 = new Stage();
            stage0.setHeight(200);
            stage0.setWidth(300);
            // APPLICATION_MODAL该应用只能有这一个模态框,只能在该模态框操作,其它任何窗口都无法操作
//            stage1.initModality(Modality.APPLICATION_MODAL);
            // 设置父窗口
            stage0.initOwner(stage);
            // WINDOW_MODAL表示,只有父窗口是禁用的,其它窗口都可以使用
            stage0.initModality(Modality.WINDOW_MODAL);
            stage0.show();
        });

        button1.setOnAction(e -> {
            Stage stage1 = new Stage();
            stage1.setHeight(200);
            stage1.setWidth(300);
            stage1.show();
        });

        Scene scene = new Scene(pane, 500, 500);
        stage.setScene(scene);
        // 设置标题
        stage.setTitle("林风最帅");
        // 设置窗口图标,从窗口中获取Icons然后添加一个Image实例即可
        stage.getIcons().add(new Image("image/logo.png"));
        // 锁定窗口大小,禁止用户改变窗口大小,包括最大化,默认允许
        stage.setResizable(false);
        // 设置窗口风格样式
        // 注意:UNDECORATED在没有场景的情况下什么都不显示
        stage.initStyle(StageStyle.UNDECORATED);
        // 显示窗口
        stage.show();
    }
图片路径:
StageStyle和Modality
StageStyle风格
舞台具有以下样式之一:
StageStyle.DECORATED- 具有纯白色背景和平台装饰的舞台。(默认)StageStyle.UNDECORATED- 具有纯白色背景且没有任何装饰的舞台。StageStyle.TRANSPARENT- 背景透明且无任何装饰的舞台。StageStyle.UTILITY- 具有纯白色背景和极简平台装饰的舞台。
Modality
Modality.APPLICATION_MODAL:定义一个模式窗口,阻止事件传递到任何其他应用程序窗口。Modality.NONE:定义一个非模态且不阻塞任何其他窗口的顶级窗口。(默认)Modality.WINDOW_MODAL:定义一个模式窗口,阻止事件传递到其整个所有者窗口层次结构。
Event
窗口事件,为减少代码看着不那么乱,单独拎出来了
    @Override
    public void start(Stage stage) throws Exception {
        Button button = new Button("窗口");
        button.setLayoutX(200);
        button.setLayoutY(200);
        AnchorPane pane = new AnchorPane();
        pane.getChildren().addAll(button);

        // 关闭操作系统默认退出程序操作
        Platform.setImplicitExit(false);
        stage.setOnCloseRequest(e -> {
            // 关闭操作系统默认关闭窗口操作
            e.consume();

            // 弹出窗口询问是否关闭窗口
            // 若是则退出,不是则无操作
            Alert alert = new Alert(Alert.AlertType.CONFIRMATION);
            alert.setTitle("退出程序");
            alert.setHeaderText(null);
            alert.setContentText("您是否要退出程序?");
            Optional<ButtonType> result = alert.showAndWait();
            if(result.get() == ButtonType.OK) {
                // 退出程序并关闭窗口
                Platform.exit();
                // 下面的代码仅仅是关闭窗口,并没有结束进程
                // stage.close();
            }
        });

        Scene scene = new Scene(pane, 500, 500);
        stage.setScene(scene);
        stage.setTitle("林风最帅");
        stage.show();
    }
页面场景切换及其鼠标图片样式
示例代码:
    @Override
    public void start(Stage stage) throws Exception {
        // 编写第一个场景
        Button button0 = new Button("hello world!");
        button0.setLayoutX(200);
        button0.setLayoutY(200);
        AnchorPane root = new AnchorPane();
        root.getChildren().addAll(button0);
        Scene scene = new Scene(root, 500, 500);

        // 给第一个场景设置鼠标图片,用来替换原鼠标样式
        scene.setCursor(new ImageCursor(new Image(getClass().getResourceAsStream("/image/cursor1.png"))));

        // 编写第二个场景
        Label label = new Label("你好,世界!");
        label.setLayoutX(200);
        label.setLayoutY(200);
        Button button1 = new Button("返回原参数页面");
        button1.setLayoutX(200);
        button1.setLayoutY(250);
        AnchorPane root1 = new AnchorPane();
        root1.getChildren().addAll(label, button1);
        Scene scene1 = new Scene(root1, 500, 500);

        // 给第二个场景设置鼠标图片,用来替换原鼠标样式
        scene1.setCursor(new ImageCursor(new Image(getClass().getResourceAsStream("/image/cursor.png"))));

        // 页面切换逻辑
        // 其实就是把场景进行替换
        button0.setOnAction(e -> {
            stage.setScene(scene1);
        });
        button1.setOnAction(e -> {
            stage.setScene(scene);
        });

        stage.setScene(scene);
        stage.setTitle("林风测试");
        stage.getIcons().addAll(new Image("image/logo.png"));
        stage.show();
    }
Node类
Node类是一个抽象类,其所有控件或其父类都继承的Node类
layoutX/layoutY/preWidth/preHeight
style/visible/opacity/blendMode
tanslateX/tanslateY/rotate/scaleX/scaleY/scaleZ
parent/scene/id
案例一:layoutX/layoutY/preWidth/preHeight、style
    @Override
    public void start(Stage stage) throws Exception {
        Label label = new Label("Hello world");

        // 设置坐标
        label.setLayoutX(200);
        label.setLayoutY(200);
        // 设置样式: 跟css一样,红色背景,蓝色边框,边框宽度3像素
        label.setStyle("-fx-background-color: red; -fx-border-color: blue; -fx-border-width: 3px;");
        // 设置宽高
        label.setPrefWidth(200);
        label.setPrefHeight(80);
        // 设置label的内容居中
        label.setAlignment(Pos.CENTER);

        AnchorPane root = new AnchorPane();
        root.getChildren().addAll(label);
        Scene scene = new Scene(root, 500, 500);
        stage.setScene(scene);
        stage.show();
    }
案例二:visible/opacity/rotate/translateX/translateY
    @Override
    public void start(Stage stage) throws Exception {
        Label label = new Label("Hello world");

        // 设置样式
        label.setPrefWidth(200);
        label.setPrefHeight(200);
        label.setAlignment(Pos.CENTER);
        label.setStyle("-fx-background-color: red;");

        // 设置透明度
        label.setOpacity(0.5);
        // 旋转45度
        label.setRotate(45);
        // 平移
        label.setTranslateX(100);
        label.setTranslateY(50);

        // 不显示控件
        label.setVisible(false);

        AnchorPane root = new AnchorPane();
        root.getChildren().addAll(label);
        Scene scene = new Scene(root, 500, 500);
        stage.setScene(scene);
        stage.show();
    }
UI控件的属性绑定和属性监听
Property接口:在Node中几乎所有的属性都使用的Property子类的实例
案例:让一个圆形居中,并监听Y轴变化输出
    @Override
    public void start(Stage stage) throws Exception {
        Circle circle = new Circle();
        circle.setCenterX(250);
        circle.setCenterY(250);
        circle.setRadius(100);
        circle.setStroke(Color.BLACK);
        circle.setFill(Color.WHITE);
        AnchorPane root = new AnchorPane();
        Scene scene = new Scene(root, 500, 500);

        // 创建单项绑定
        circle.centerXProperty().bind(scene.widthProperty().divide(2));
        circle.centerYProperty().bind(scene.heightProperty().divide(2));

        // 监听器,当Y轴改变时触发
        circle.centerYProperty().addListener(new ChangeListener<Number>() {
            @Override
            public void changed(ObservableValue<? extends Number> observableValue, Number oldValue, Number newValue) {
                System.out.println("Y轴改变,原来值为:" + oldValue + " 现在值为:" + newValue);
            }
        });

        root.getChildren().addAll(circle);

        stage.setScene(scene);
        stage.show();
    }
JavaFX中的事件驱动编程
Node抽象类中有很多事件
案例一:点击事件和键盘事件
    @Override
    public void start(Stage stage) throws Exception {
        AnchorPane root = new AnchorPane();

        Label label = new Label("你好");
        label.setLayoutX(200);
        label.setLayoutY(200);
        Button button = new Button("向上移动");
        button.setLayoutX(200);
        button.setLayoutY(250);

        // 设置按钮点击事件
        button.setOnAction(new EventHandler<ActionEvent>() {
            @Override
            public void handle(ActionEvent actionEvent) {
                label.setLayoutY(label.getLayoutY() - 5);
            }
        });

        root.getChildren().addAll(label, button);
        Scene scene = new Scene(root, 500, 500);

        // 设置键盘抬起的时候
        scene.setOnKeyReleased(e -> {
            KeyCode keyCode = e.getCode();
            if(keyCode.equals(KeyCode.DOWN)){
                System.out.println("aaaa");
                // 按下了向下的箭头
                label.setLayoutY(label.getLayoutY() + 5);
            }
        });

        stage.setScene(scene);
        stage.show();
    }
案例二:文件拖拽事件
    @Override
    public void start(Stage stage) throws Exception {
        AnchorPane root = new AnchorPane();
        Scene scene = new Scene(root, 500, 500);

        TextField textField = new TextField();
        textField.setLayoutX(150);
        textField.setLayoutY(200);

        // 定义一个当拖动手势在此范围内进行时要调用的函数Node。
        textField.setOnDragOver(e -> {
            // 传输模式:any表示包含所有传输模式的数组。
            e.acceptTransferModes(TransferMode.ANY);
        });

        // 松开手之后
        textField.setOnDragDropped(e -> {
            Dragboard dragboard = e.getDragboard();
            // 如果有文件
            if(dragboard.hasFiles()){
                // 获取文件路径
                String path = dragboard.getFiles().get(0).getAbsolutePath();
                textField.setText(path);
            }
        });

        root.getChildren().addAll(textField);
        stage.setScene(scene);
        stage.show();
    }
Color、Font和Image
Color
Color.颜色Color.rgb(red, green, blue, alpha)Color.hsb(a,b,c,d):色相饱和度明度不透明度Color.web("#ffffff"):参考css
案例
    @Override
    public void start(Stage stage) throws Exception {
        AnchorPane root = new AnchorPane();
        Scene scene = new Scene(root, 500, 500);

        Circle circle = new Circle();
        circle.setCenterX(250);
        circle.setCenterY(250);
        circle.setRadius(100);


        // 设置填充色:红色,不透明度0.5
        circle.setFill(Color.web("#f00", 0.5));
        // 设置边框颜色:蓝色,不透明度0.5
        circle.setStrokeWidth(10);
        circle.setStroke(Color.rgb(0, 0, 255, 0.5));

        root.getChildren().addAll(circle);
        stage.setScene(scene);
        stage.show();
    }
Font
font(double size)
font(String family)
font(String family, double size)
font(String family, FontPosture posture, double size)
font(String family, FontWeight weight, double size)
font(String family, FontWeight weight, FontPosture posture, double size)
案例:
// 设置字体大小
label.setFont(new Font(30));
Image
用法:
Image(InputStream is)
Image(String url)
Image(String url, boolean backgroundLoading)
案例:
    @Override
    public void start(Stage stage) throws Exception {
        AnchorPane root = new AnchorPane();
        Scene scene = new Scene(root, 500, 500);
        ImageView imageView = new ImageView();
        Image image = new Image(getClass().getResourceAsStream("/image/logo.png"));
        imageView.setImage(image);
        root.getChildren().addAll(imageView);
        stage.setScene(scene);
        stage.show();
    }
恭喜你,到这里基础的部分就算完结了,你现在可以写一些简单的小软件了
进阶部分
FXML布局文件的使用
先看下纯Java的代码:
    @Override
    public void start(Stage stage) throws Exception {
        Label label = new Label("Hello world");
        label.setLayoutX(150);
        label.setLayoutY(200);
        label.setFont(new Font(30));
        Button button = new Button("向上移动");
        button.setLayoutX(150);
        button.setLayoutY(260);
        button.setOnAction(e -> label.setLayoutY(label.getLayoutY() - 5));
        AnchorPane root = new AnchorPane();
        root.getChildren().addAll(label, button);
        Scene scene = new Scene(root, 500, 500);
        stage.setScene(scene);
        stage.show();
    }
我们现在在项目的Java文件路径下创建一个FXML文件:
<?xml version="1.0" encoding="UTF-8"?>

<?import java.lang.*?>
<?import java.util.*?>
<?import javafx.scene.*?>
<?import javafx.scene.control.*?>
<?import javafx.scene.layout.*?>

<?import javafx.scene.text.Font?>
<AnchorPane xmlns="http://javafx.com/javafx"
            xmlns:fx="http://javafx.com/fxml"
            fx:controller="vip.linfeng.javafx01.DemoController"
            prefHeight="400.0" prefWidth="600.0">

    <children>
        <Label fx:id="la"
               text="Hello world"
               layoutX="150"
               layoutY="200">
            <font>
                <Font size="30" />
            </font>
        </Label>

        <Button fx:id="bu"
                onAction="#onUp"
                text="向上移动"
                layoutX="150"
                layoutY="260" />
    </children>

</AnchorPane>
然后创建一个controller文件
public class DemoController {
    @FXML
    Label la;

    @FXML
    Button bu;

    public void onUp() {
        la.setLayoutY(la.getLayoutY() - 5);
    }
}
最后简化主类
public class Main extends Application {
    public static void main(String[] args) {
        Application.launch(args);
    }

    @Override
    public void start(Stage stage) throws Exception {
        Pane root = FXMLLoader.load(getClass().getResource("Demo.fxml"));
        Scene scene = new Scene(root, 500, 500);
        stage.setScene(scene);
        stage.show();
    }
}
运行一下,完美~
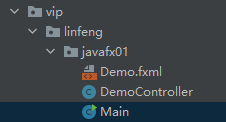
最后附上结构图:
知识补充
其实到上面就已经可以了,你现在可以写一些中小型项目,只要你会看文档就行,官方的文档是个好东西,会用会查那么80%的难题都不在话下。然后有一些比较常用的知识补充一下:
initialize方法
public class OneController {
    @FXML
    Button btn;

    @FXML
    void action(ActionEvent e) {
        System.out.println("行,你有种");
    }

    /**
     * 初始化事件
     * 可以用来绑定一些复杂的操作或做一些复杂的操作
     */
    public void initialize() {

    }
}
Maven项目
是不是感觉找各种依赖包特别麻烦?尤其当你好不容易把所有依赖包一个个下载完后,一运行发现,版本冲突,天塌了!
所以这次教你将JavaFX用Maven进行管理
这里我就不再重建项目了,偷个小懒,把之前项目的pom.xml端上来吧
<?xml version="1.0" encoding="UTF-8"?>
<project xmlns="http://maven.apache.org/POM/4.0.0"
         xmlns:xsi="http://www.w3.org/2001/XMLSchema-instance"
         xsi:schemaLocation="http://maven.apache.org/POM/4.0.0 http://maven.apache.org/xsd/maven-4.0.0.xsd">
    <modelVersion>4.0.0</modelVersion>

    <groupId>site.hsdj</groupId>
    <artifactId>accessexcel</artifactId>
    <version>1.0</version>

    <packaging>jar</packaging>

    <properties>
        <maven.compiler.source>17</maven.compiler.source>
        <maven.compiler.target>17</maven.compiler.target>
        <project.build.sourceEncoding>UTF-8</project.build.sourceEncoding>

        <!-- JavaFX版本 -->
        <javafx-version>21.0.7</javafx-version>
        <!-- ucanaccess版本 -->
        <u-can-access-version>5.0.1</u-can-access-version>
        <!-- dbutils版本 -->
        <commons-dbutils-version>1.7</commons-dbutils-version>
        <!-- POI版本 -->
        <poi-version>5.2.3</poi-version>
        <!-- log4j2版本 -->
        <log4j2-version>2.20.0</log4j2-version>
        <!-- commons-lang3版本 -->
        <commons-lang3-version>3.12.0</commons-lang3-version>
        <!-- lombok版本 -->
        <lombok-version>1.18.30</lombok-version>
        <!-- 请求依赖版本 -->
        <apache-httpcomponents>4.5.13</apache-httpcomponents>
        <!-- jackson版本 -->
        <jackson-version>2.18.2</jackson-version>
        <!-- yaml解析器版本 -->
        <snakeyaml-version>2.4</snakeyaml-version>
        <snakeyaml-engine-version>2.9</snakeyaml-engine-version>
    </properties>

    <dependencies>

        <!-- JavaFX依赖 -->
        <dependency>
            <groupId>org.openjfx</groupId>
            <artifactId>javafx-controls</artifactId>
            <version>${javafx-version}</version>
        </dependency>
        <dependency>
            <groupId>org.openjfx</groupId>
            <artifactId>javafx-graphics</artifactId>
            <version>${javafx-version}</version>
        </dependency>
        <dependency>
            <groupId>org.openjfx</groupId>
            <artifactId>javafx-base</artifactId>
            <version>${javafx-version}</version>
        </dependency>
        <dependency>
            <groupId>org.openjfx</groupId>
            <artifactId>javafx-fxml</artifactId>
            <version>${javafx-version}</version>
        </dependency>

        <!-- access依赖 -->
        <dependency>
            <groupId>net.sf.ucanaccess</groupId>
            <artifactId>ucanaccess</artifactId>
            <version>${u-can-access-version}</version>
            <scope>runtime</scope>
        </dependency>
        <dependency>
            <groupId>commons-dbutils</groupId>
            <artifactId>commons-dbutils</artifactId>
            <version>${commons-dbutils-version}</version>
        </dependency>

        <!-- POI依赖 -->
        <dependency>
            <groupId>org.apache.poi</groupId>
            <artifactId>poi</artifactId>
            <version>${poi-version}</version>
        </dependency>
        <dependency>
            <groupId>org.apache.poi</groupId>
            <artifactId>poi-ooxml</artifactId>
            <version>${poi-version}</version>
        </dependency>

        <!-- log4j2核心依赖,用于关闭报错,满足POI依赖 -->
        <dependency>
            <groupId>org.apache.logging.log4j</groupId>
            <artifactId>log4j-core</artifactId>
            <version>${log4j2-version}</version>
        </dependency>

        <!-- log4j2api依赖,用于可以正常使用log4j2 -->
        <dependency>
            <groupId>org.apache.logging.log4j</groupId>
            <artifactId>log4j-api</artifactId>
            <version>${log4j2-version}</version>
        </dependency>

        <!-- 常用工具包 -->
        <dependency>
            <groupId>org.apache.commons</groupId>
            <artifactId>commons-lang3</artifactId>
            <version>${commons-lang3-version}</version>
        </dependency>

        <!-- Lombok依赖 -->
        <dependency>
            <groupId>org.projectlombok</groupId>
            <artifactId>lombok</artifactId>
            <version>${lombok-version}</version>
            <scope>provided</scope>
        </dependency>

        <!-- 请求依赖 -->
        <dependency>
            <groupId>org.apache.httpcomponents</groupId>
            <artifactId>httpclient</artifactId>
            <version>${apache-httpcomponents}</version>
        </dependency>
        <dependency>
            <groupId>org.apache.httpcomponents</groupId>
            <artifactId>httpmime</artifactId>
            <version>${apache-httpcomponents}</version>
        </dependency>

        <!-- Jackson -->
        <dependency>
            <groupId>com.fasterxml.jackson.core</groupId>
            <artifactId>jackson-databind</artifactId>
            <version>${jackson-version}</version>
        </dependency>
        <dependency>
            <groupId>com.fasterxml.jackson.core</groupId>
            <artifactId>jackson-core</artifactId>
            <version>${jackson-version}</version>
        </dependency>
        <dependency>
            <groupId>com.fasterxml.jackson.core</groupId>
            <artifactId>jackson-annotations</artifactId>
            <version>${jackson-version}</version>
        </dependency>

        <!-- yaml解析器 -->
        <dependency>
            <groupId>org.yaml</groupId>
            <artifactId>snakeyaml</artifactId>
            <version>${snakeyaml-version}</version>
        </dependency>

    </dependencies>

    <build>
        <plugins>
            <!-- 指定主类 -->
            <plugin>
                <groupId>org.apache.maven.plugins</groupId>
                <artifactId>maven-jar-plugin</artifactId>
                <version>3.3.0</version>
                <configuration>
                    <archive>
                        <manifest>
                            <addClasspath>true</addClasspath>
                            <mainClass>site.hsdj.accessexcel.ApplicationMain</mainClass>
                        </manifest>
                    </archive>
                </configuration>
            </plugin>

            <!-- 包含所有包 -->
            <plugin>
                <groupId>org.apache.maven.plugins</groupId>
                <artifactId>maven-shade-plugin</artifactId>
                <version>3.5.1</version>
                <executions>
                    <execution>
                        <phase>package</phase>
                        <goals>
                            <goal>shade</goal>
                        </goals>
                        <configuration>
                            <transformers>
                                <transformer implementation="org.apache.maven.plugins.shade.resource.ManifestResourceTransformer">
                                    <mainClass>site.hsdj.accessexcel.ApplicationMain</mainClass>
                                </transformer>
                            </transformers>

                            <!-- 排除JavaFX相关依赖 -->
                            <filters>
                                <filter>
                                    <artifact>org.openjfx:*</artifact>
                                    <excludes>
                                        <exclude>**</exclude>
                                    </excludes>
                                </filter>
                            </filters>
                        </configuration>
                    </execution>
                </executions>
            </plugin>

            <!-- 编译Java源代码 -->
            <plugin>
                <groupId>org.apache.maven.plugins</groupId>
                <artifactId>maven-compiler-plugin</artifactId>
                <version>3.11.0</version>
                <configuration>
                    <excludes>
                        <exclude>module-info.java</exclude>
                    </excludes>
                </configuration>
            </plugin>

        <resources>
            <resource>
                <!--把src/main/java目录下的properties、xml文件打包打进程序中-->
                <directory>src/main/java</directory>
                <includes>
                    <include>**/*.properties</include>
                    <include>**/*.xml</include>
                    <include>**/*.fxml</include>
                </includes>
                <filtering>false</filtering>
            </resource>

            <resource>
                <!--把src/main/resources目录下的properties、xml、css、图片文件打包打进程序中-->
                <directory>src/main/resources</directory>
                <includes>
                    <include>**/*.properties</include>
                    <include>**/*.yml</include>
                    <include>**/*.xml</include>
                    <include>**/*.fxml</include>
                    <include>**/*.css</include>
                    <include>**/*.setting</include>
                    <!-- 添加图片格式支持 -->
                    <include>**/*.png</include>
                    <include>**/*.jpg</include>
                    <include>**/*.jpeg</include>
                    <include>**/*.gif</include>
                    <include>**/*.bmp</include>
                    <include>**/*.svg</include>
                </includes>
                <filtering>false</filtering>
            </resource>

            <resource>
                <!--把lib/目录下第三方jar包打进程序中,如systemPath目录下的jar-->
                <directory>lib/</directory>
                <includes>
                    <include>**/*.jar</include>
                </includes>
                <filtering>false</filtering>
            </resource>
        </resources>

    </build>

</project>
别看依赖这么多,这里只需要关注JavaFX部分和打包插件即可
工具封装
AccessDBUtils
这里肯定会有人问了,唉~,MySQL呢?为啥不把MySQL端上来,而是Access?
因为我只封装过Access的,MySQL因为没在JavaFX项目中用过,所以。。。。
package site.hsdj.accessexcel.common.utils;

/**
 * @auth linfeng
 * @create 2025/6/4 10:40
 * @Description
 */
import org.apache.commons.dbutils.QueryRunner;
import org.apache.commons.dbutils.handlers.BeanListHandler;
import org.apache.commons.dbutils.handlers.MapListHandler;
import org.apache.commons.dbutils.handlers.ScalarHandler;

import java.sql.Connection;
import java.sql.DriverManager;
import java.sql.SQLException;
import java.util.List;
import java.util.Map;

/**
 * Access数据库操作工具类
 */
public class AccessDBUtils {
    private String dbPath;
    private String password;
    private Connection connection;

    /**
     * 构造函数
     * @param dbPath Access数据库文件路径
     * @param password 数据库密码(可为空)
     */
    public AccessDBUtils(String dbPath, String password) {
        this.dbPath = dbPath;
        this.password = password;
    }

    /**
     * 获取数据库连接
     * @return Connection对象
     * @throws SQLException
     * @throws ClassNotFoundException
     */
    public Connection getConnection() throws SQLException, ClassNotFoundException {
        if (connection == null || connection.isClosed()) {
            // 加载驱动
            Class.forName("net.ucanaccess.jdbc.UcanaccessDriver");

            // 构建连接字符串
            String connectionString = "jdbc:ucanaccess://" + dbPath;
            if (password != null && !password.isEmpty()) {
                connectionString += ";password=" + password;
            }

            // 建立连接
            connection = DriverManager.getConnection(connectionString);
        }
        return connection;
    }

    /**
     * 关闭数据库连接
     */
    public void closeConnection() {
        if (connection != null) {
            try {
                connection.close();
            } catch (SQLException e) {
                System.err.println("关闭数据库连接时出错");
                e.printStackTrace();
            }
        }
    }

    /**
     * 查询数据并映射为Bean列表
     * @param sql SQL查询语句
     * @param beanClass Bean类
     * @param <T> 泛型类型
     * @return Bean列表
     * @throws SQLException
     * @throws ClassNotFoundException
     */
    public <T> List<T> queryBeanList(String sql, Class<T> beanClass) throws SQLException, ClassNotFoundException {
        QueryRunner qr = new QueryRunner();
        return qr.query(getConnection(), sql, new BeanListHandler<>(beanClass));
    }

    /**
     * 查询数据并映射为Map列表
     * @param sql SQL查询语句
     * @return Map列表
     * @throws SQLException
     * @throws ClassNotFoundException
     */
    public List<Map<String, Object>> queryMapList(String sql) throws SQLException, ClassNotFoundException {
        QueryRunner qr = new QueryRunner();
        return qr.query(getConnection(), sql, new MapListHandler());
    }

    /**
     * 查询单个值
     * @param sql SQL查询语句
     * @return 查询结果
     * @throws SQLException
     * @throws ClassNotFoundException
     */
    public <T> T queryScalar(String sql) throws SQLException, ClassNotFoundException {
        QueryRunner qr = new QueryRunner();
        return qr.query(getConnection(), sql, new ScalarHandler<T>());
    }

    /**
     * 执行更新操作(INSERT, UPDATE, DELETE)
     * @param sql SQL语句
     * @param params 参数
     * @return 影响的行数
     * @throws SQLException
     * @throws ClassNotFoundException
     */
    public int update(String sql, Object... params) throws SQLException, ClassNotFoundException {
        QueryRunner qr = new QueryRunner();
        return qr.update(getConnection(), sql, params);
    }

    /**
     * 在try-with-resources中使用
     * @return 自动关闭的AccessDbUtil实例
     */
    public AutoCloseableAccessDbUtil autoCloseable() {
        return new AutoCloseableAccessDbUtil(this);
    }

    /**
     * 自动关闭的包装类
     */
    public static class AutoCloseableAccessDbUtil implements AutoCloseable {
        private final AccessDBUtils dbUtil;

        public AutoCloseableAccessDbUtil(AccessDBUtils dbUtil) {
            this.dbUtil = dbUtil;
        }

        public AccessDBUtils getDbUtil() {
            return dbUtil;
        }

        @Override
        public void close() {
            dbUtil.closeConnection();
        }
    }
}
运行案例:
public class AccessDBUtilsTest {
    public static void main(String[] args) {
        new AccessDBUtilsTest().testTryWithResources();
    }

    public void testTryWithResources() {
        // 或者使用try-with-resources方式
        try (AccessDBUtils.AutoCloseableAccessDbUtil autoDbUtil =
                     new AccessDBUtils("D:\\test\\db\\test.mdb", "test").autoCloseable()) {

            AccessDBUtils dbUtil = autoDbUtil.getDbUtil();
            // 执行数据库操作...
            // 查询示例2:查询Map列表
            List<Map<String, Object>> mapResults = dbUtil.queryMapList("select * from tablename where ID = 397949");
            for (Map<String, Object> row : mapResults) {
                System.out.println(row);
            }
        } catch (SQLException | ClassNotFoundException e) {
            e.printStackTrace();
        }
    }

    public void testTry() {
        AccessDBUtils dbUtil = new AccessDBUtils("D:\\test\\db\\test.mdb", "test");

        try {
            // 查询示例1:查询Bean列表
            List<ZuZhuangTest> results = dbUtil.queryBeanList(
                    "select ID as id, username as code from tablename where ID = 397946",
                    ZuZhuangTest.class);

            for (ZuZhuangTest item : results) {
                System.out.println("item = " + item);
            }

            // 查询示例2:查询Map列表
            List<Map<String, Object>> mapResults = dbUtil.queryMapList("select * from tablename where ID = 397949");
            for (Map<String, Object> row : mapResults) {
                System.out.println(row);
            }

            // 更新示例
//            int updatedRows = dbUtil.update("update tablename set code = ? where id = ?", "newCode", 1);
//            System.out.println("更新了" + updatedRows + "行");

        } catch (SQLException | ClassNotFoundException e) {
            e.printStackTrace();
        } finally {
            // 关闭连接
            dbUtil.closeConnection();
        }
    }
}
其实还有很多封装的工具这里因为篇幅问题,怕文章太长导致页面加载慢或卡顿,所以不再列举了
常见问题
接下来就是大家很容易遇到的一些问题(不知道大家遇到没,反正我遇到了)
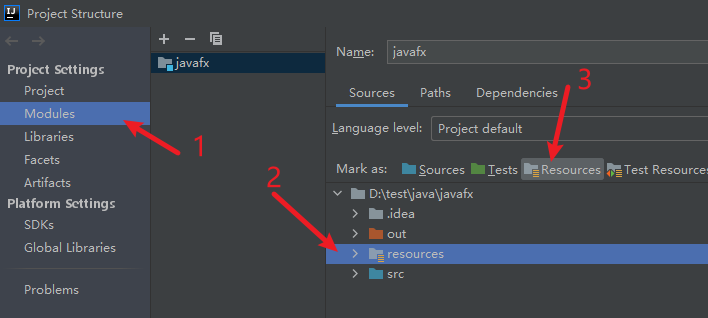
纯Java项目设置resources目录
首先在项目根目录下创建一个文件夹,名称为resources
File-Project Structure...
点击Modules
点击你创建的resources目录
点击Mark as 中的Resources即可设置成功
点击Apply,点击OK
设置右键FXML文件打开SceneBuilder
确保已安装 SceneBuilder
从 Gluon 官网 下载并安装 SceneBuilder
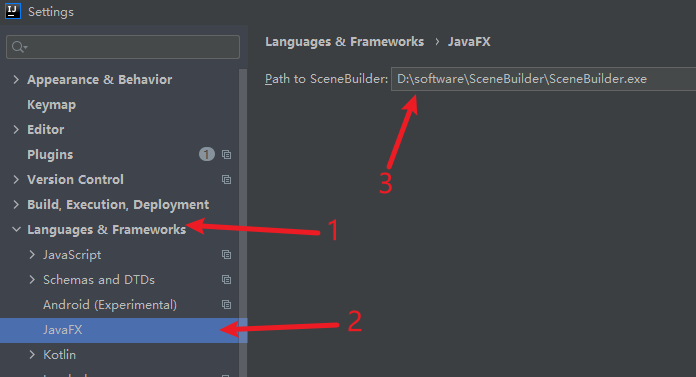
在 IntelliJ IDEA 中配置:
文件(File) > 设置(Settings) > 语言和框架(Languages & Frameworks) > JavaFX 2. 在 "SceneBuilder 路径" 中指定你的 SceneBuilder 可执行文件路径 3. 应用设置后,右键点击 FXML 文件即可看到 "Open in SceneBuilder" 选项
如图:
路径问题
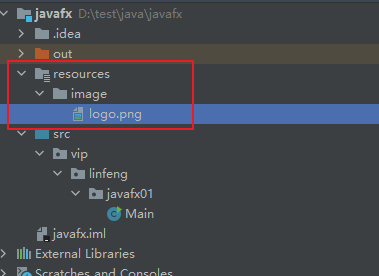
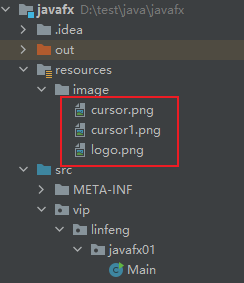
纯Java项目图片资源路径问题
我的目录结构如图:
生产环境使用(推荐使用)
// 给场景设置鼠标图片,用来替换原鼠标样式
scene1.setCursor(new ImageCursor(new Image(getClass().getResourceAsStream("/image/cursor.png"))));
// 设置窗口图标
stage.getIcons().add(new Image(getClass().getResourceAsStream("/image/logo.png")));
调试测试时使用(不推荐使用)
// 给场景设置鼠标图片,用来替换原鼠标样式
scene1.setCursor(new ImageCursor(new Image("file:resources/image/cursor.png")));
// 设置窗口图标
stage.getIcons().add(new Image("image/logo.png"));
Maven项目
以下案例全都是在你配置了maven之后的路径
         <resource>
             <!--把src/main/java目录下的properties、xml文件打包打进程序中-->
             <directory>src/main/java</directory>
             <includes>
                 <include>**/*.properties</include>
                 <include>**/*.xml</include>
                 <include>**/*.fxml</include>
             </includes>
             <filtering>false</filtering>
         </resource>
加载FXML文件
Pane root = FXMLLoader.load(getClass().getResource("/vip/linfeng/test/modules/home/fxml/DataBaseHome.fxml"));
Scene scene = new Scene(root);
你可以封装个工具类来简化代码:
public class FilePathUtils {
    /**
     * 获取FXML的绝对路径
     * @param module 模块路径
     * @param fxmlName FXML文件名称
     * @return 返回FXML文件的绝对路径
     */
    public static String getFXMLPath(String module, String fxmlName) {
        return String.format("/site/hsdj/accessexcel/modules/%s/fxml/%s.fxml", module, fxmlName);
    }
}
使用:
Pane root = FXMLLoader.load(getClass().getResource(FilePathUtils.getFXMLPath("home", "DataBaseHome")));